Basic HTML tutorial: Create Your Own Web Project Step by Step -Part 3 - BOSS SOLUTION
September 30, 2020
Basic HTML tutorial: create your own web project – Part 3
In this tutorial, I will discuss a brief introduction of Intro to HTML. Create your first page and how to structure text with tags in HTML. So let’s learn about this.
Index
- Compose the internal structure of a web page with HTML
- How you can include images, videos or graphics on your website
- How to link pages and content: the importance of hyperlinks
- The final stretch: launch the online page
- CSS and JavaScript: why HTML is only the beginning
Compose the internal structure of a web page with HTML
In the next chapter of this HTML tutorial, we deal with a web page’s basic structure. HTML documents contain text, links, and other types of content such as images or videos and the metadata mentioned above, which reveals to the browser and to�search engine crawlers how they should read the page.
Some of this metadata is invisible to the user who opens a page. But others are shown in the title tab, in history, or as the headline of the search engine results.
Reduced to its minimum necessary elements, the basic code of an HTML page in Spanish would be something like this:
<!DOCTYPE html> <html lang="en"> <head> <meta charset="UTF-8"> <meta name="description" content="Here you can find all information about the HTML basic framework"> <title>Learn HTML: The basic framework</title> </head> <body> </body> </html>
An HTML document is composed, according to this example, of the three sections�DOCTYPE,�head (header), and�body (body of the document), although the first, since it is the�definition of the type of document that follows, is the only one that It must appear before the�<html> tag that encloses the content of the file. DOCTYPE allows the application to read the document to be told which standard its programmer has followed. In this case, it is HTML5, a type of document that any browser can recognize, and that allows the use of both current and older code, which is why it is convenient to use it, especially if you are learning to write with HTML.
In the header, framed by the�<head> tag, we have included the character encoding to be used by the browser (�meta charset ), the meta description, relevant to the search engine (�meta name = “description” ), or the title of the page web (�title ), which appears at the top of the browser. Although optional is highly recommended to favor a good evaluation by the search engine, numerous metadata can also be added. The only exception is the�<title> element, since it is the only mandatory element in an HTML document, together with the definition of the document type. A�link will be added�to the CSS file later to the header, where the design and format aspects are contained.
The�<body> tag marks what the browser should show the user.
Note: The tags for the basic HTML structure are optional; that is, they could, in theory, not be included. In this case, the browser would automatically create the�<html> ,�<head> and�<body> tags and subordinate the corresponding elements to them. However, the normal thing is to create them. Breakdown makes the document easier to read, which is especially beneficial for beginners.
How you can include images, videos, or graphics on your website
There is no doubt that text is the main component of any web page. Still, visual stimuli in the form of images, photos, or graphics greatly influence the user experience, which makes them�essential if you want to design a good page. These three formats are commonly used, supported by all browsers:
- JPG: The JPG format is used for photos, or graphics similar to photographs, with strong contrast and great chromatic diversity. It can represent to us more than 16+ million colors and compress files considerably, although it is linked to a loss of quality from the image.
- PNG: this is the format for graphics and logos, as it can represent between 256 (PNG8) and 16.7 million colors (PNG24), and, unlike JPG, it compresses without qualitative loss. In return, the file is larger.
- GIF: files in GIF format can only represent 256 colors, although they are widely used in web development because it allows you to create small animations, navigation elements, or simple graphics.
The tag that allows adding an image to an HTML file is�<img> (“image” = image), to which the directory where the image is stored is added so that the browser knows where to look for it. For this, the�src attribute, from English “source” (source), and the file path are used.
It is advisable to create a subfolder with the name “Images” in the�project directory that contains the HTML document and save in it all the images used on the web.
The example image from our HTML tutorial is called�graph1.png and is located in the aforementioned “Images” folder. In this way, the line of code that we should write to integrate this visual element on the web would be:
<img src="images/graphic1.png" />
Other image attributes, such as width (�width ), height (�height ), or alternative text, are highly recommended to use. Defining the size of the image in width and height allows the browser to reserve a space for it already during the loading of the page, in such a way that, during that period of time and until it is fully loaded, it can display other content in parallel less heavy on the browser window without having to complete the�download process of the image file, which would slow down the loading of the web as a whole.
The�alt attribute, on the other hand, allows you to write an alternative text for the image, which appears when it cannot be displayed and which should be included in the basic HTML repertoire for three reasons:
- It favors the�page’s accessibility because it offers information about the photograph in case of visualization problems.
- It helps the�search engine robots to classify the image and counts as extra content for its positioning.
- The HTML usage specifications dictate it.
Expanded with these attributes that we have mentioned, the HTML code phrase would look like this:
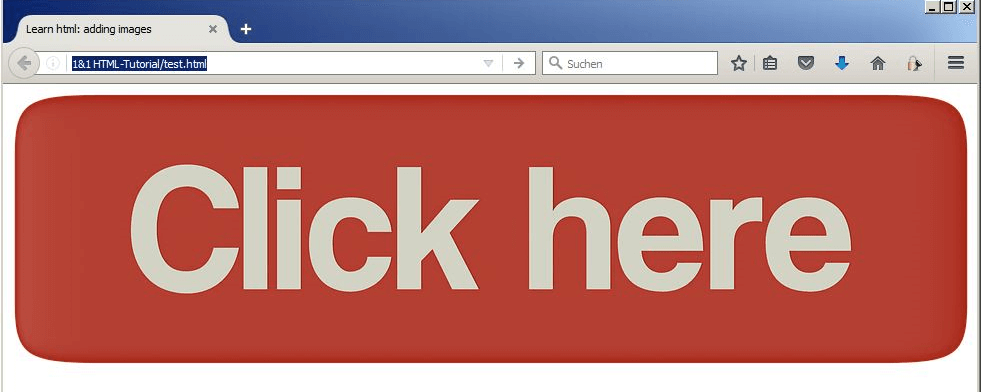
<img src="images/HTML-Tutorial-14.png" width="960" height="274" alt="Learn HTML: this is how the embedded sample graphic 'click here' appears:" />
Note: The variables ‘960’ and ‘274’ for width and height correspond, respectively, to the original measurement of the graphic image. The browser automatically calculates its pixel equivalence.
How to link pages and content: the importance of hyperlinks
Hyperlinks or hyperlinks, a name from the English word “hyperlink” and popularly known as “links,” are the main reason for the world wide web’s unprecedented success and cannot be missed in an introductory HTML course. Without these electronic references that�lead the user from one page to another or that initiate some action, such as downloading a document, there could not be an interconnection such as that offered by the network of networks. Three types of link can be distinguished:
- Internal: internal links articulate a web page and guide the user in their navigation. This internal structure can have different forms, from a linear one, for example, in which the user can go from one subpage to another on the web in a certain order, to an arboreal one, in which the user chooses where to go from the main page. It is also possible to use internal links on the same page, whose function could involve directing the user to the beginning of the text once it has reached the end.
- External: these are the links that send the user to another website and are used to offer added value or recommend a different offer. In this case, if you want to avoid a negative evaluation in the search engine, it is convenient to avoid an excess of external links, as well as the quality of the content that is linked, and the operation of the link itself must be regularly controlled.
- Other links: not all links link to HTML documents. Some also refer to downloading a document, opening the email client, or activating the PDF viewer.
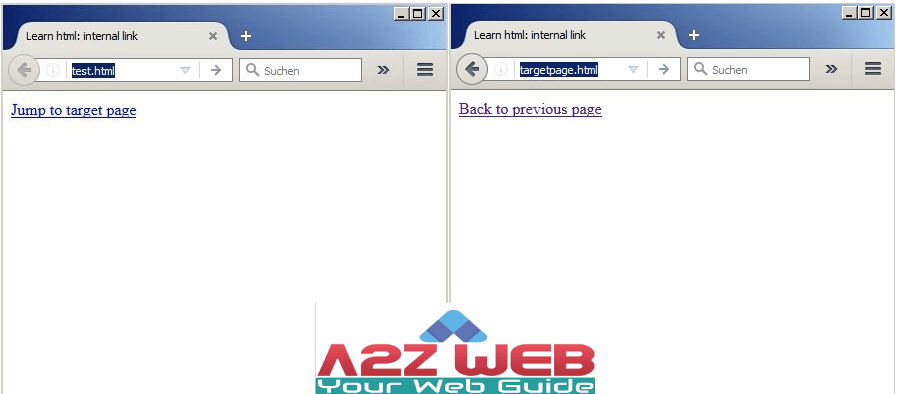
Internal links: this is how you articulate your project
Over time you will be able to apply the notions acquired in this HTML course in structuring more complex projects, but first, we will�start by linking two pages. You will need to create another page that you can link to that first�test.html. This new page must have a different name,�targetpage.html (“target page”), for example, and must be saved in the same directory as the first one.
The HTML�<a> tag is used to generate a link, which derives from “anchor,” anchor in Spanish, and whose function is simply to indicate that the framed information is a link. It means that you always need an attribute,�href (hyper reference), that points to where the link goes. The link text that the browser displays by default in blue and underlined is written framed in the�<a> tag.
Including the following line of code in the test page we link it to the second page (target page):
<a href="targetpage.html">Jump to target page</a>
If the hyperlink is working properly, an empty page should open, as no action has yet been taken on this second page. In the next step, we include in this new page another internal link that redirects to the original one (previous page):
<a href="test.html">Back to previous page</a>
Link to external content
To create an external link on a page, you do not need a different tag. Still, it is not necessary to know how directory the page to be linked is located, since referring to foreign content only requires�knowing the full web address or URL where it is located. It already contains all the necessary information. However, as this content does not reside on your own web server, you do not�influence the quality of the link, so a regular review is necessary.
It is important to invest time in writing the precise and attractive text for the link since empty words like “here” give the user very little information about what they will find if they click on it.
Try including an external link on your page with the following line of code, which generates a link to our Digital Guide:
<p>HTML tutorial and numerous guides on the topic of websites, hosting, and much more at <a href=" https://www.ionos.com/digitalguide ">IONOS Digital Guide</a> </p>
These hyperlinks take your visitors away from your page, and although they can return�by pressing the browser’s “go back” button (←), they cannot be trusted to do so. There is, however, the possibility that the linked page opens automatically in a new tab or window, so that the first page (your page) remains open: the�target attribute describes where the linked document is to be opened, and the variable _�blank (blank) specifies its opening in a new window.
This is written as follows:
<a href="https://www.ionos.com/digitalguide" target="_blank">IONOS Digital Guide</a>
The final stretch: launch the online page
In this introduction to HTML, we have seen how to create and link two HTML documents; however, you have only been able to view these pages in your browser. If you want to show them to other people, you will see that it is not possible because both the HTML sheets and the images that you have included in them are�located on your computer, so they cannot be delivered to the browser that makes the request. If you want to publish yourself and show the world your achievements, you have to register the project online and�hire the most suitable�hosting service for your project.
The first step is to find a domain (web address) for the project and register it with an Internet provider such as IONOS, which offers an online domain registration service. When the above step is done, the next step is to provide the most appropriate foundation for the project by installing and configuring�your own�web server or renting it from a web hosting provider. The latter is the most suitable option for those with less experience. By renting a web server, you avoid taking care of the�selection, installation, and maintenance of the software for the server yourself, being able to choose the package that guarantees the�storage space that your project needs.
Finally, the HTML documents that make up your website have to be uploaded to the webspace that you have at your disposal. For this, you need a�file transfer program or FTP (File Transfer Protocol). This client program allows you to exchange data with your provider’s FTP server through the protocol that gives it its name. In this article of our guide, we present an excellent selection of FTP programs. All the information you need to access the FTP server and other types of indications or instructions are provided by the provider where you rent the webspace. Keep in mind that when uploading documents to the FTP server, the file structure is not modified, so it is worth taking care of this aspect from the beginning.
CSS and JavaScript: But why the beginning is only from HTML
Throughout our basic HTML course, we have mentioned that although this language forms the foundation of every web page, its role in modern web development no longer includes visual design tasks, a task that falls to the�CSS style sheet language or Cascading Style Sheets. CSS allows you to define the�color of a page’s different elements, its basic�composition, or the�format of text passages, titles, or other content elements, giving the pages an attractive and contemporary visual appearance. This strict separation between content (code) and design greatly facilitates the most complex projects’ analysis and maintenance. All this makes it necessary to deal with this web language once you are already familiar with HTML.
We have not yet mentioned another building block of modern web design, such as JavaScript, with the help of which�dynamic elements are included in HTML pages that allow users to interact with the page. These can be image galleries, dynamic navigation menus, or external data downloads.
In either case, web developers have a repertoire of code snippets that can be easily integrated into HTML sheets. It is advisable to develop a certain degree of basic understanding of both programming languages to implement them correctly or know how to find the error in case of problems.
BOSS SOLUTION provides all kinds of web application, design and development service.
© 2023 Copyright, All Right Reserved, by BOSS SOLUTION


